Infront Web Trader
Using the Infront Web Trader for the first time?
A guide to getting started in the Web Trader. We will go through the basics on how to navigate and access market data.
Log in to Web Trader
Depending on the type of client solution you have, your login process might look different than the one outlined below. More specifically, if you have a broker-specific solution, you should access Web Trader directly from your broker’s web page.
To access Web Trader, you can start off by using the product login button at the top of this page. By doing so, you will be directed to Web Trader’s login page. Here, you want to go ahead and enter your user credentials and press “Login” to proceed.
Hint: Check the “Remember me” option if you want your browser to automatically log you on to Web Trader next time you visit our website.
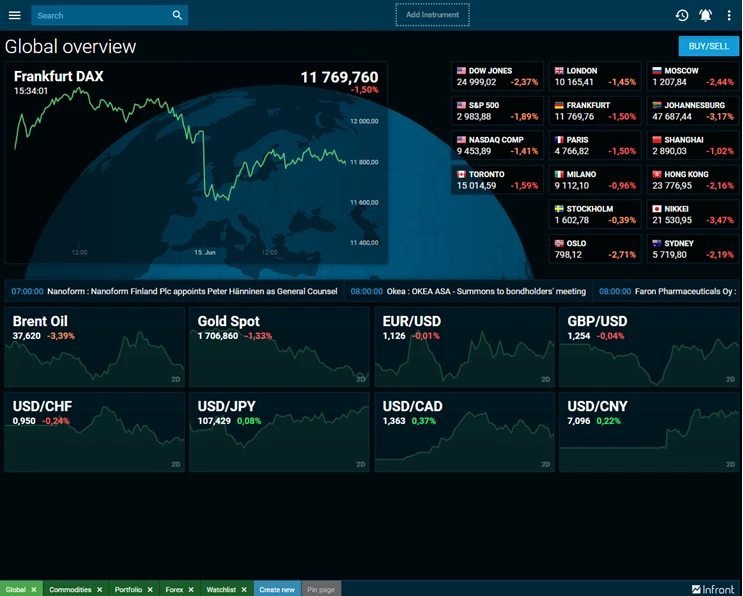
Once you have successfully logged in to your profile, you will be greeted by our default market page:
Navigation
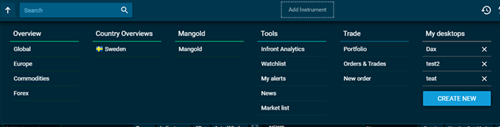
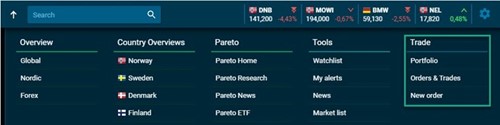
It is easy to navigate through the terminal through the main menu in the top left corner. This is the starting point of all tools and market data. You open the main menu from the three lines in the top left corner:

The main menu is structured into different categories. The information under "Overview" and "Country Overviews" will be different based on which broker you are using.
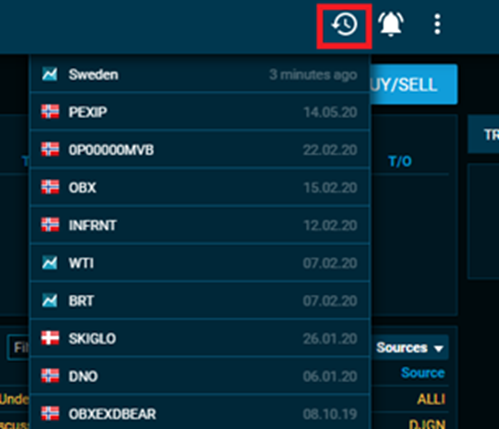
Previously viewed
On the Clock symbol in the top right corner can you see all the pages in webtrader that you have previously viewed. The newest windows you have visited comes first and then the windows are listed in descending order.
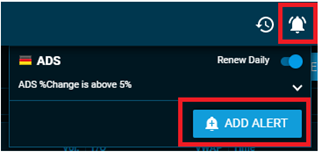
Alerts
You can access “my alerts” from the main menu under tools.From here you can edit all your existing alerts in Web Trader. You can create alerts from the bell symbol in the top right of Web Trader.

Support
To see the contact information to support, go into the menu in the top right corner and then choose support.
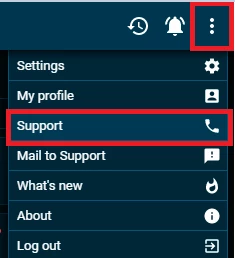
Press “mail to support” from the same menu if you want to send mail to support directly from Web Trader.
A report will then be attached with the email so that our developers can look into the issue much faster. Just press Report in the window popping up on your screen.
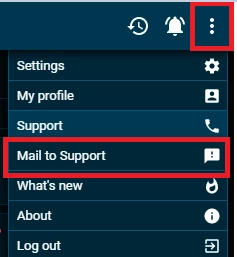
NB: It is very important that the the issue is captured when the Web Trader is running diagnostic mode. This means that you need to click on "Mail to support" before the issue appears and when the issue appears then click on "Report" to send in the issue.

Remember to fill out the information correctly so that we can investigate the issue faster and more efficiently.
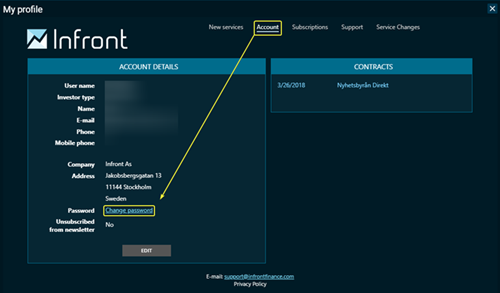
Reset password
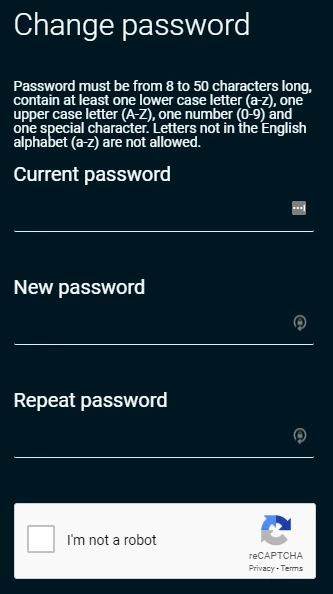
To reset your password in Infront Web Trader, you need to navigate to the three vertical dots in the top right corner, select “My Profile”, choose the “Account” option, and finally press “Change Password”:
![]()
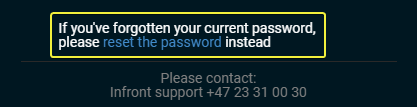
Note: To reset your password within Web Trader, you need to know your current password. If you have forgotten your current password, you can go ahead and proceed to the “email password reset” option:
Settings menu
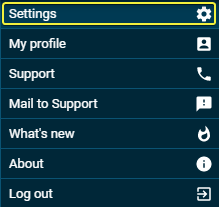
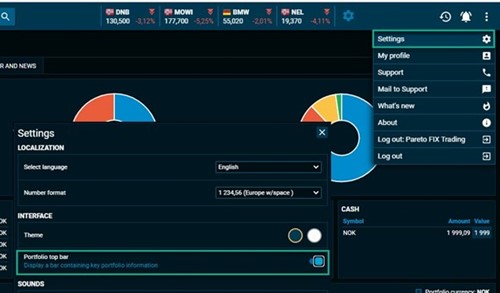
By navigating to the three vertical dots in the top right corner and then selecting “Settings”, you can access the settings menu for Web Trader:
![]()
Here, you can change a variety of Web Trader-related settings, such as your preferred language, theme color, whether you want to receive price alerts to your email and a few additional functions:
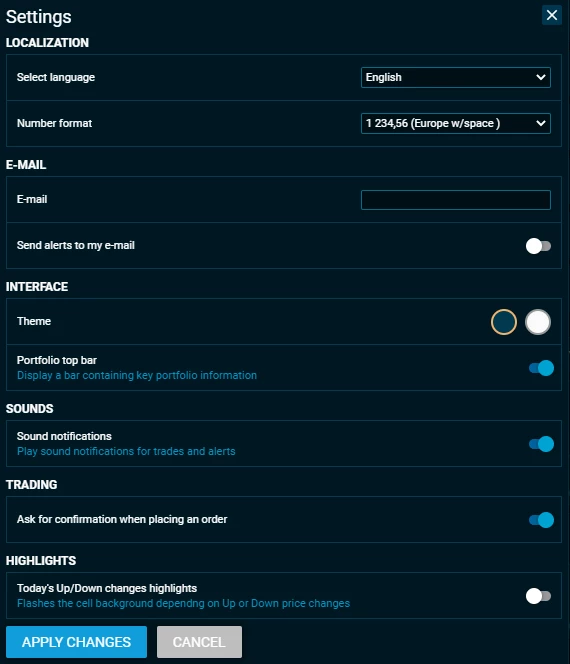
Note: To apply any changed settings, you want to make sure that you select the “Apply Changes” option.
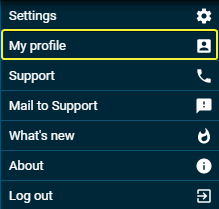
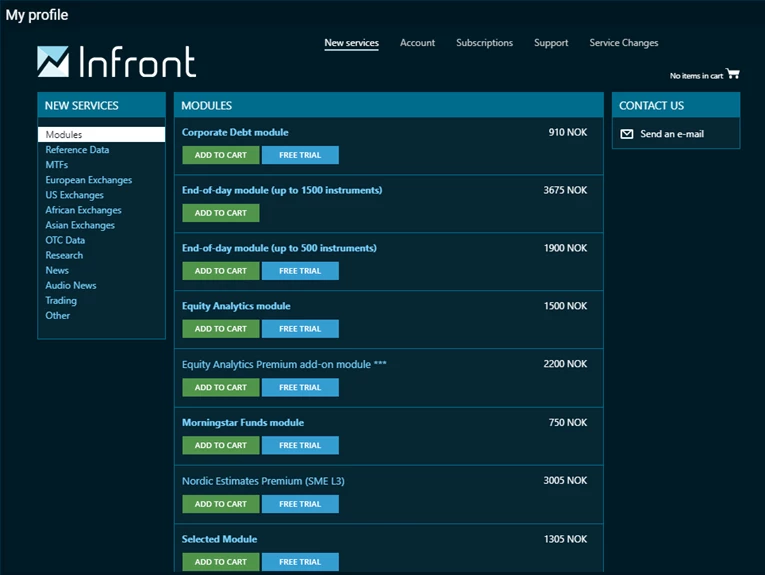
Under “My Profile” you can add new services, change your account details, view your current subscriptions, find contact information to both Infront and your broker, as well as keeping up with past and upcoming service changes.
To access “My Profile”, you need to navigate to the three vertical dots in the top right corner and select “My Profile”:
![]()
Market Data
Global desktops
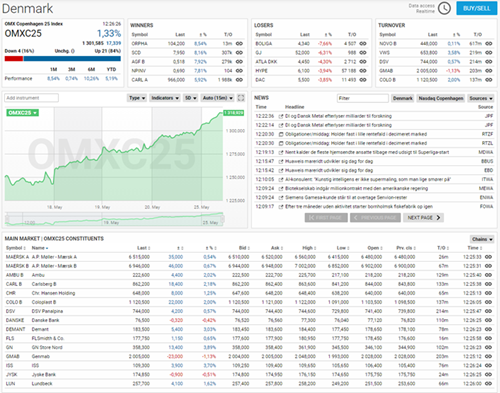
Global desktops are pre-made desktops templates, which are built by Infront and are not customizable. You can access the available country overviews by clicking on the menu, then selecting from the dropdown menu.
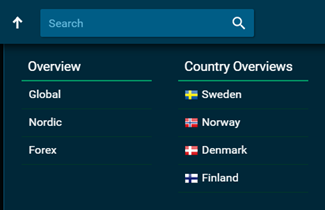
Selecting a pre-made overview from the menu bar will load the overview. We can click on “Denmark” to get the Danish country overview. These are designed to give a brief country overview and include the following widgets; Index, Ranking (winners, losers, turnover), chart, news and chain.
Local Desktops
Local desktops are desktops created by the user locally. It is different from the global desktops because the user is able to modify the widgets, and therefore are customizable for user preferences.
How To Create A Local Desktop
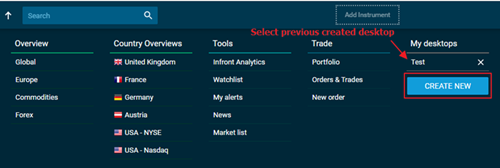
To create a local desktop open the menu and select “create new” under “My Desktops”. In the same menu you can select previously created desktops (in this example “Test” desktop).
Give your new workspace a name and click on “create new”. When creating the new desktop, it will by empty before we add widgets. To add widgets and setup your workspace, select “edit”. The desktop is now editable, and you can add widgets and arrange them to your liking. Notice the “Save” button for later when we want to save our changes. The changes will be saved on your Infront account (in the cloud), so you will be able to open the workspace from other devices.
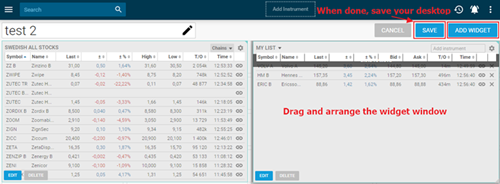
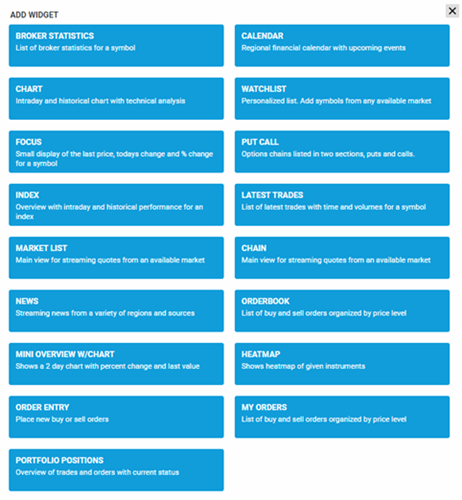
Add the widgets that you wish to display on your workspace. When creating a new desktop, you add the widgets one at the time.
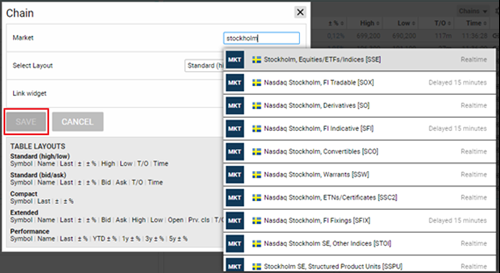
Most of the widgets must be modified in order to display data. We can select the ‘Chain’ widget where we want to display Stockholm (Swedish) equities/ETFs/Indices. Then select the preferred layout for the widget and save the widget to your desktop.
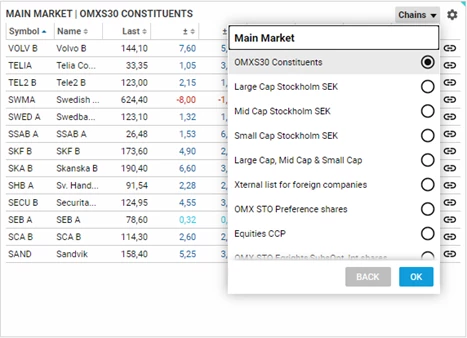
Chains explained
Chains are predefined list from the Infront file server that gives you instant access to selected symbols. When you first select a chain, the contents will be downloaded from Infronts file server and you will see streaming data for the symbols. Symbols that support chains may also support Index Constituents - that is the list of symbols that contributes to the calculated index value. For instance, clicking on “Chain” and then the “OMXS30 Constituents” index gives you access to the 30 symbols (stocks) that are included in the OMXS30 index.
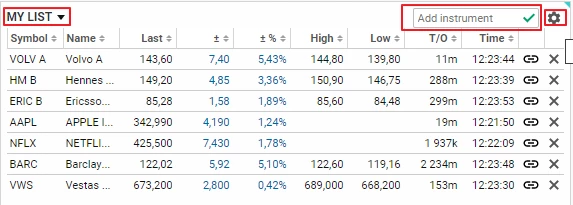
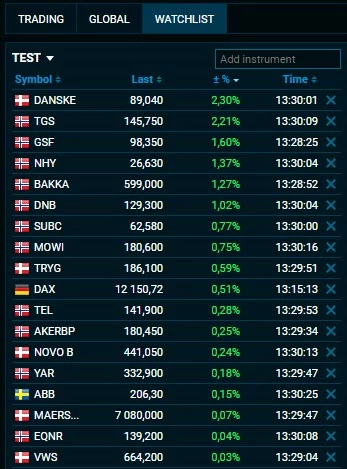
Using the watchlist
The watchlist widget enables you to add symbols from any market you have access to or open an existing watchlist you have saved in the cloud from before. You can also change the columns of the watchlist with the settings symbol.
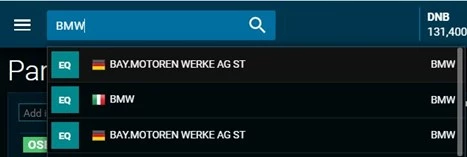
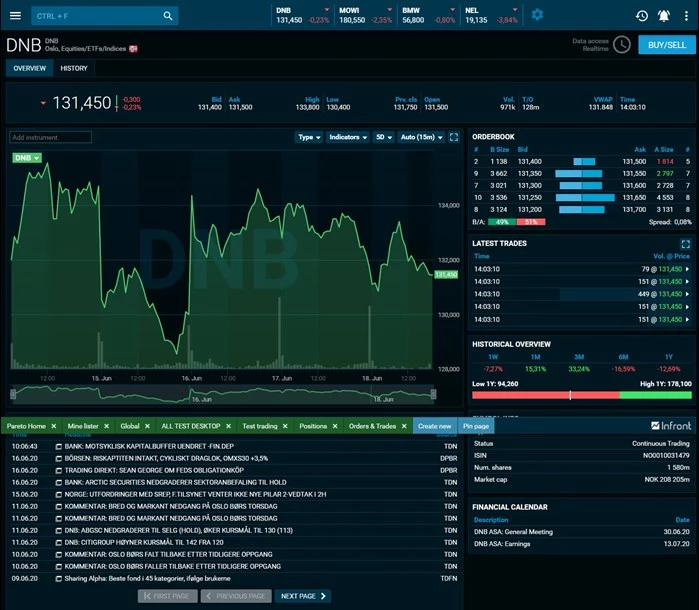
Instrument overview page
The instrument overview page gives you information about the instrument. The instrument page is different based on what kind of instrument you are looking at. To search up an instrument use the top left search bar in Web Trader.
Here you will get all the relevant information for the given instrument. Since we are looking at a stock we will also get related news and upcoming financial events.
Linking element
It is also possible to link widgets together. This means that you can easily change which instrument to be shown in a widget without manually changing all widgets. This can be done by clicking on the "Edit" button to go into the edit mode for your local desktop:
![]()
Click on the "Edit" button for all the widgets you want to link together:

Make sure "Link widget" is sat to be active. Note that you also get this settings window for each widget when you first add the widget to your desktop.
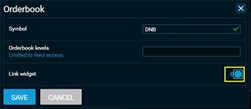
Once the widgets are linked together you can use the "Link" button to change all the linked widgets to the same instrument.

Right sidebar
The right sidebar is visible no matter what window in Web Trader you are currently looking at. It gives you fast and easy access to an overview over your portfolio, global indices, commodities, forex and your watchlists.
Trading
Trading in General
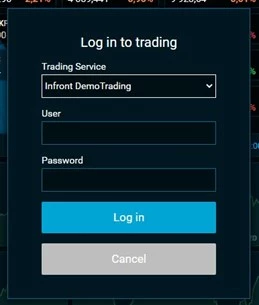
If you have access to trading through the Infront Web Trader you will have the possibility to login to the trading gateway for your broker. Trading login will be prompted when you try to open any services in the Web Trader that need trading access.
It can be accessed from the Main Menu.
Or from the right sidebar.
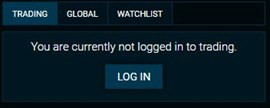
On login you are prompted with a trading login window. The login credentials for logging in to trader is not the same credentials you use to log in to the Web Trader. The trading login credentials are provided to you by your broker.
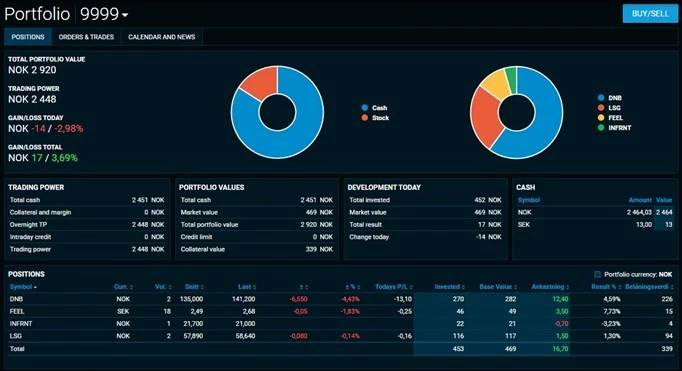
Positions
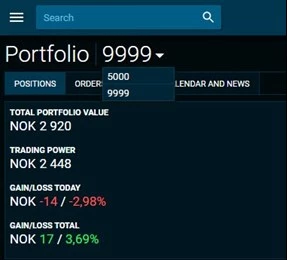
The Positions page gives you an overview over your current holdings. Here you can view our total portfolio value, trading power and gain/loss. You also see all your positions in the given portfolio. Toggling between portfolios is done by the dropdown selector at the top of the page.
Toggling between portfolios is done through the top dropdown selector.
Portfolio top bar
By going into the main menu you can toggle the portfolio top bar. This makes it possible to toggle between your portfolios in the top header bad.
Here you will see your total portfolio value and trading power.
![]()
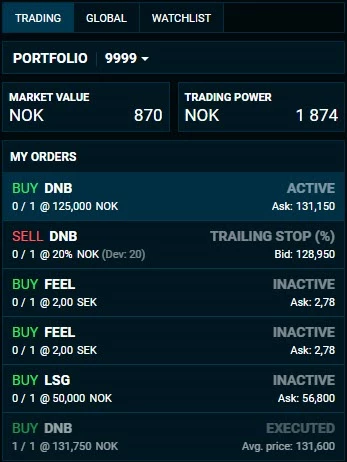
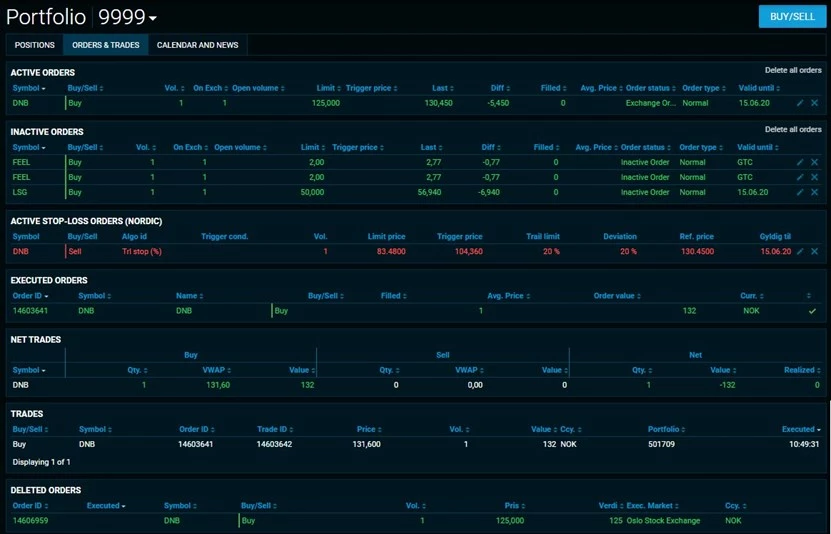
Orders & Trades
On the portfolio page you can access your Orders & Trades by selecting the second tab. Net trades (intraday) is also shown here.
This page updates dynamically and will hide specific sections if there is no data available. The specification is as following:
- Active orders (Always shown)
- Inactive orders
- Algo orders
- Executed orders
- Net Trades (Always shown)
- Trades (Always shown)
- Deleted orders
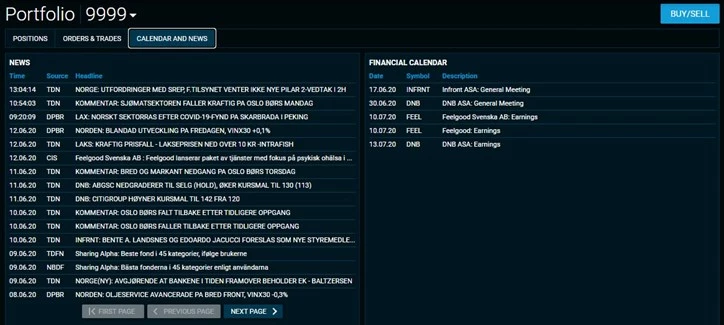
Calendar & News
The Calendar & News tabs give you the news articles and upcoming calendar events for your portfolio. It's mainly premium news sources like TDN, Direkt and Dow Jones that tags their news articles with the company tickers. Press releases from the Stock exchanges are also tagged with the company tickers and will also show up here.
The Calendar shows 6 months of upcoming calendar events for your portfolio.
Trading in sidebar
You can trade through the right sidebar. Here you have access to your positions and orders.
The orders are shown in what we call the orderstack. This is a more compact way to view your orders and have the same design as we use in our mobile application. Active orders are highlighted and placed at the top of the orderstack. The sorting of orders are done by the specification below:
- ACTIVE, AtClose, AtOpen, GTC, ICEBERG (Highlighted)
- Order request, Offline, Pending insert (non highlighted)
- All algo orders, all strategy orders (non highlighted)
- Inactive (non highlighted)
- Executed orders (Light fade)
- Deleted orders (Faded)